

Before reading this tutorial: please, notice english is a foreign language for me. I do my best to explain things as clear as possible, but I'm sure you'll find lots of mistakes and odd sentences. Try to be comprehensive and, if you think you can help me improve any part of it, PLEASE, PLEASE, PLEASE don't hesitate to leave a comment with your suggestions. Thank you!
Junebug Dress Remix Tutorial
The first step is to get the pieces of the pattern. We need any kind of A-line dress
pattern or we can draft it from a dress that we already have. We also need the downloadable (for free!) pattern pieces for the original Junebug Dres from Craftiness is not Optional.
The dress consists of 6 parts: a 3-piece front, a back piece and 2 facings.
We will leave the back piece as is, and will only change the front piece.
Since the seam allowance is already included in the pattern I used, I skipped that step. If your pattern doesn't include seam allowances, remember to add them before cutting the pieces out of fabric.
We'll measure our victim to find out where shall we place the pockets. To do this we will have to make her stand with her elbows slightly bent (as if she had her hands in her pockets).Measure from top shoulder to the fingertips and add 4 cm (about 1 1/2 ").This will be our 'A' measurement. Now measure from above her shoulder to the wrist; this is measurement 'B'.
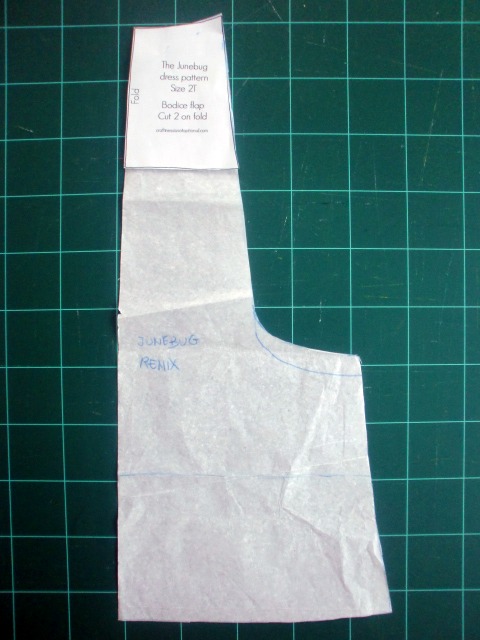
Buttoned flap
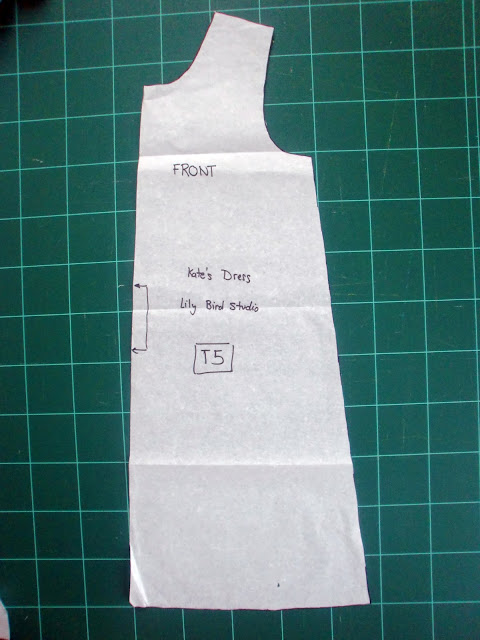
Take the front piece of the A-line dress pattern. (I used the Kate's dress pattern from Lily Bird Studio, you can buy it here or here)
Mark on the front pattern piece the measurements we have taken before: the red arrow is the length shoulder-wrist (measuremnent 'B') and the green arrow is the distance from shoulder to the fingertips + 4 cm (measurement 'A'). On the right is the finished
piece:

To make the following pattern pieces I used the pieces from Jess' tutorial you can download them for free!.
Although I was making a 5/6 size , the pieces for size 2/3 worked perfectly.
Place the 'bodice flap' piece on top of the dress front piece. Do your best to align the lower part of both necklines. Following the outline on the right of Jess' piece, extend the line to the mark we did before for the shoulder-wrist distance (measurement 'B', red arrow)). Round the area of the pocket as you like
First piece ready!
flap facing:
We will make a piece identical to the one we have done before, but with a shorter length . Do you remember the shoulder-finger tip + 4cm distance (measurement 'A') we have indicated with a green arrow? this should be the length of this piece.
We have to copy the previous piece and cut out the bottom at the height of the mark we made. This piece, in addition to being the flap facing is also the front of the pocket, this is why the length is up to the fingertips.
Second piece ready!
bodice front sides
Let's make the third piece.
We have to modify the original front piece (the pattern we are using as a starting point) to obtain a piece like the one in the picture below (on the left you have the original piece without modification and on the right the modified piece):

to make it we need the piece in Jess' tutorial called 'bodice front / sides'. Again, I used the piece for 2T size without anyalteration:

Place Jess' piece on top of your starting front piece matching (as possible) the neck and shoulder edges. In photo above indicated with blue arrows. Cut the neck line following the shape of Jess' piece , pictured above with a pink arrow.
Next, we'll extend the left edge of Jess' piece (yellow arrow) to almost double it (this measurement is not very scientific, I know, but since it's hidden under the flap in the finished garment it has little importance, provided that is big enough to let the gir'ls head go through easily (since it's the only opening in the dress)).
Now let's determine the length of this piece. To do this, take the last piece, the flap facing (notice that the picture below actually shows the flap piece and not the flap facing piece, sorry, the length of the facing is indicated with a dashed line):

and place it on the piece we're working on, matching the neck line (yellow arrow) and the edge to be cut on fold (pink arrow):

Trim the piece so that it has the same length as the flap facing, see the blue arrow. Notice this piece is also the back piece of the pocket and that is why it is important it is the same lenght as the front pocket piece (flap facing) since the lower edges of both pieces must be sewn together.
third piece completed!.
The hardest part is ready.
Front sides facing
Taking the previous piece (the bodice front sides) copy the shoulder edge (from approximately half armpit edge), the neckline and under flap opening edge (indicated by the pink line). Leaving a width of about 3-4cm (this is the size that I did, but you can make the width you feel more comfortable with) draw a curved line (blue line) that joins the ends of the pink line. My recommendation is you make it wide enough so it can be hold by the stitches you'll make to attach the buttons..

This is what you should have:

Back facing
Now take the Back piece for the dress pattern you're using as a start point.
We'll copy the neckline area, taking the width of the shoulder (again you can take the width you prefer, however, since the front and back facings will be sewn at the shoulder edge, they should be the same width at this point) draw a parallel line to the neckline.


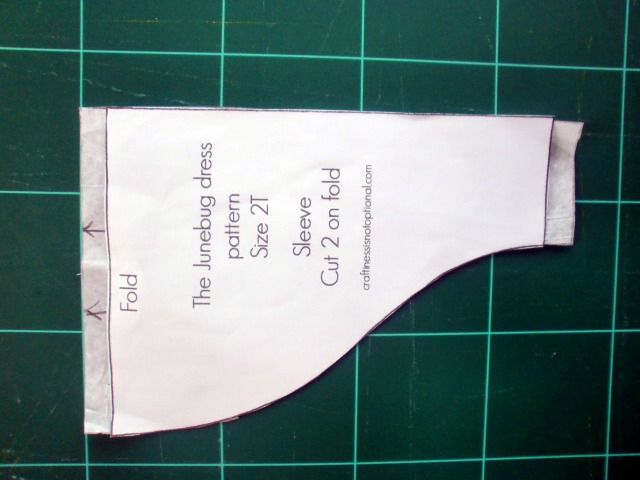
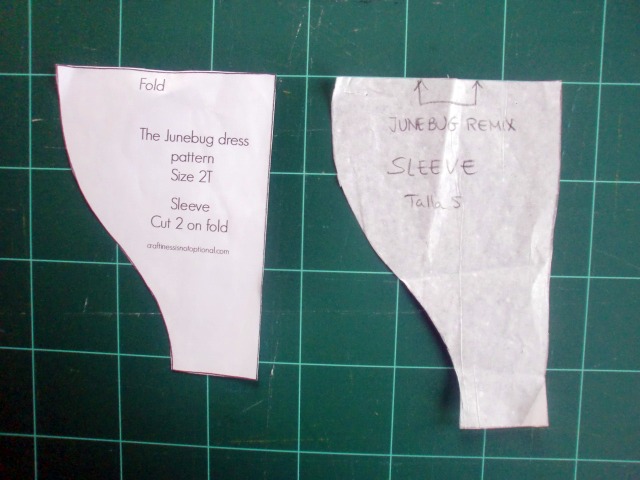
Sleeves:
Again I rely on the pieces supplied by Jess from Craftiness Is Not Optional. The only modification I did was adding 1 cm (about 1/2") at the bottom and another 1/2" at the top. (Now, considering that the sleeve was too big for my taste, perhaps I would not. I will leave that to your discretion)
done! we have finished for today!
Come back tomorrow for the second part of the tutorial: we'll cut the pieces and sew the dress.***edited: click here to go to the second part of this tutorial***
PS: This tutorial is for personal use only . Please, be respectful with other people's work. If you post something about this tutorial in your blog / website please include a link to my blog. Do not copy the tutorial on your website / blog, please.
.
Me encanta!! No me da tiempo de hacerlo esta semana pero lo he puesto en mi fb para que venga mucha gente a tu estupendo tutorial. Vaya trabajazo!!
ResponEliminaMaría
awwww - it turned out great! Your buttons and fabric work so well together. Come see some of my boy projects ~ Suzanne
ResponEliminahttp://winterwonderingswanderingswhatnot.blogspot.com/2012/08/project-0-updates-competitive-nature.html
Esto es lo que mi madre diría un jumper ,me encanta.Tengo que hacerlo.Gracias.
ResponEliminaNo encontré la forma de suscribirme por
correo electrónico.Pero me suscribí
a los comentarios .
jumper ,me encanto
gracias Susana.
EliminaEn cuanto a lo de suscribir-te puedes hacerlo en el recuadro que hay en la columna de la derecha que dice "amics que voldria tenir prop" (en catalan significa "amigos que quisiera tener cerca"), verás que hay un montón de fotos o dibujos pequeños que son los de cada seguidor; pulsa sobre el botón azul que dice "Inscriviu-vos en aquest...". Si no te funciona también puedes probar en el recuadro que hay justo debajo que dice "subscriu-te al meu bloc!", pulsando el botón que dice "escrits".
Espero que te funcione y vengas a visitarme de vez en cuando!
Thank you so much for this tutorial. It is so generous of you! I used it and it turned out so great! http://crearsouille.blogspot.be/2013/01/des-robes-soeur-pour-la-bonne-annee.html
ResponEliminaMUITO OBRIGADO VOU FAZER PARA AS NETAS
ResponElimina